Category Archives: CodeProject

Using MapKit and CoreLocation Information in iOS 8

I have been working on an application that will display the current users information along with other information in his/her surrounding area and thought to share my findings regarding MapKit, CoreLocation and iOS 8 in a simple application for others to use.

I used Introduction to MapKit in iOS 6 Tutorial and Getting the user’s location using CoreLocation as a foundation to help get me started. I found however that both articles are missing the information needed to display and get the users current information with iOS 8.

Create the Project

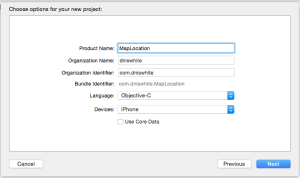
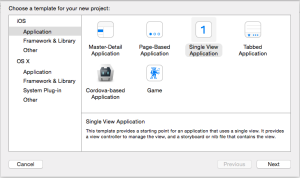
Let’s start off with creating a Single View Application:

Screen Shot 2015-01-25 at 12.11.08 PM

Screen Shot 2015-01-25 at 12.11.52 PM

Once the project has been created the next step is to make sure that the MapKit and CoreLocation frameworks are added into the project.

Screen Shot 2015-01-25 at 12.33.26 PM

Laying Out the Screen Design

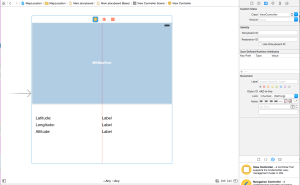
Now that we have the project requirements taken care of let’s move to laying out the screen. By clicking on the Main.storyboard you’ll get the blank View that comes configured with the project. Drag a MKMapView to the top half of the view and then below that add a group of labels that the application will use to display Latitude, Longitude and Altitude.

Screen Shot 2015-01-25 at 3.12.57 PM

Time to Make it All Work

If you want you can run the application and what you’ll see is the map displayed and the labels sitting blank. While the achievement gives as much excitement as a “Hello World” application it really is lacking the level of excitement that comes as you interact with the user.

The first step in creating that interaction is to wire the storyboard we just designed into the code for the application. With the storyboard still displayed I am going to change to the Assistant Editor so that both the Storyboard view and the header (ViewController.h) are displayed next to each other.

Screen Shot 2015-01-25 at 3.30.55 PM

In the header file I am going to import CoreLocation.h and MapKit.h.

#import <MapKit/MapKit.h>
#import <CoreLocation/CoreLocation.h>

Before wiring things let’s create create a property for dealing with location information:

@property (nonatomic, strong) CLLocationManager *locationManager;

Now lets proceed by control dragging the Labels and MKMapView that our code will have to interact with into the header file.

#import <UIKit/UIKit.h>
#import <MapKit/MapKit.h>
#import <CoreLocation/CoreLocation.h>

@interface ViewController : UIViewController

@property (nonatomic, strong) CLLocationManager *locationManager;
@property (weak, nonatomic) IBOutlet MKMapView *mapView;
@property (weak, nonatomic) IBOutlet UILabel *labelLatitude;
@property (weak, nonatomic) IBOutlet UILabel *labelLongitude;
@property (weak, nonatomic) IBOutlet UILabel *labelAltitude;

@end

As we now move on to the implementation of ViewController.m we are left with making sure that the locationManager is started and that our mapView knows to display the current location of where our user is located.

At the top of ViewController.m add some helper definitions that we’ll use in converting metrics to feet and miles.

#define METERS_MILE 1609.344
#define METERS_FEET 3.28084

In the interface section lets make sure to add the CLLocationManagerDelegate as a delegate that the ViewController will implement part of.

@interface ViewController ()
<CLLocationManagerDelegate>

@end

Then in the viewDidLoad method we are going to add the code to start the location manager and have the mapView display the users current location.

- (void)viewDidLoad {
    [super viewDidLoad];

    [[self mapView] setShowsUserLocation:YES];
    
    self.locationManager = [[CLLocationManager alloc] init];
    
    [[self locationManager] setDelegate:self];
    [[self locationManager] setDesiredAccuracy:kCLLocationAccuracyBest];
    [[self locationManager] startUpdatingLocation];
}

Finally make sure to wire up part of the CLLocationManagerDelegate so that we can begin receiving location information from the users current location.

-(void) locationManager:(CLLocationManager *)manager didUpdateLocations:(NSArray *)locations {
    CLLocation *location = locations.lastObject;
    [[self labelLatitude] setText:[NSString stringWithFormat:@"%.6f", location.coordinate.latitude]];
    [[self labelLongitude] setText:[NSString stringWithFormat:@"%.6f", location.coordinate.longitude]];
    [[self labelAltitude] setText:[NSString stringWithFormat:@"%.2f feet", location.altitude*METERS_FEET]];
}

With that all complete go ahead and run the application.

Screen Shot 2015-01-25 at 3.49.43 PM

What gives??  The pulsating blue dot and location information at the bottom are missing plus we were never prompted by iOS to give the application the permission to use our current location. With some further inspection you should also see some exception information about not being able to start the location manager.

In iOS 8 there is now an added step that applications must take in being authorized to receive location information. Depending on the location services that your application needs to use there are the following requests:

In the notes for requestAlwaysAuthorization you will see that Apple has identified privacy concerns and warns about its use. For this application we only need to use requestWhenInUseAuthorization so I will leave the other as further reading to those interested.

Changes for iOS 8

Change the the viewDidLoad method so that we are now requesting authorization as required with iOS 8.

NOTE – While iOS 8 is enjoying a fairly large installation rate I am still going to make sure that the code works with iOS 7. To do this I am going to query the locationManager to see if it supports this new method.

- (void)viewDidLoad {
    [super viewDidLoad];

    [[self mapView] setShowsUserLocation:YES];
    
    self.locationManager = [[CLLocationManager alloc] init];
    
    [[self locationManager] setDelegate:self];
    
    // we have to setup the location maanager with permission in later iOS versions
    if ([[self locationManager] respondsToSelector:@selector(requestWhenInUseAuthorization)]) {
        [[self locationManager] requestWhenInUseAuthorization];
    }
    
    [[self locationManager] setDesiredAccuracy:kCLLocationAccuracyBest];
    [[self locationManager] startUpdatingLocation];
}

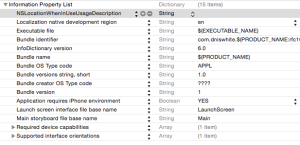
Now all that remains is to add NSLocationWhenInUseUsageDescription into Info.plist.

Screen Shot 2015-01-25 at 4.30.23 PM

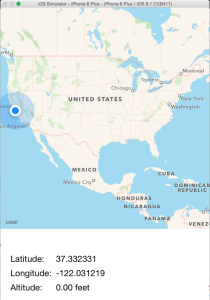
Run the app now.

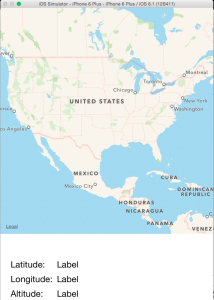
Screen Shot 2015-01-25 at 4.40.56 PM

There is that pulsating blue dot and now our application is showing us where the users current location is. The zoomed out view might be a bit extreme and in my opinion isn’t going to be very useful for most users.

Focus and Zoom the Map

As soon as we get the users location information lets zoom the map more into the location for where the user located.

-(void) locationManager:(CLLocationManager *)manager didUpdateLocations:(NSArray *)locations {
    CLLocation *location = locations.lastObject;
    [[self labelLatitude] setText:[NSString stringWithFormat:@"%.6f", location.coordinate.latitude]];
    [[self labelLongitude] setText:[NSString stringWithFormat:@"%.6f", location.coordinate.longitude]];
    [[self labelAltitude] setText:[NSString stringWithFormat:@"%.2f feet", location.altitude*METERS_FEET]];
    
    // zoom the map into the users current location
    MKCoordinateRegion viewRegion = MKCoordinateRegionMakeWithDistance(location.coordinate, 2*METERS_MILE, 2*METERS_MILE);
    [[self mapView] setRegion:viewRegion animated:YES];
}

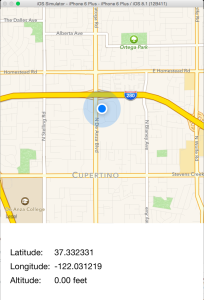
Run the app now.

Screen Shot 2015-01-25 at 4.52.27 PM

There you have it!!!  For now you can find the source here and as always Happy Coding.
UIActionSheet with Blocks

A very simple solution to a problem that bugged for me for sometime.

So I was recently doing some work on DNISSwiperCell when I came across the need to be able to access a custom UITableViewCell (DNISItemCell) from the event of a selection made from a UIActionSheet. Since the UIActionSheet was displayed from a button click on the cell I had access to the cell but once I left the scope of the event for the button being clicked I could not find a way to get that cell object.

I had thought of several different ways to stuff the object in various places but all the solutions really had the appearance of a hack that I knew I would hate myself for later. What I wanted was a way to pass in a callback like I do in javascript that would at the same time give me access to that object (Closure).

Luckily I had been playing with Blocks a couple of months back and I was realizing this would be a great way to solve my problem. So I first created a simple implementation of a block that I could assign to a property in the class.

It looked something like the following:

typedef void (^simpleBlock)(void);
simpleBlock callBack;

Then when I created the action sheet I could assign a block to that variable:

UIActionSheet *actionSheet = [[UIActionSheet alloc] initWithTitle:NULL delegate:self cancelButtonTitle:@"Cancel" destructiveButtonTitle:NULL otherButtonTitles:@"Action Button", nil];

callBack = ^{
    // add code here for the block
};

[actionSheet setActionSheetStyle:UIActionSheetStyleDefault];
[actionSheet showInView: [self view]];

Then all that remained was handling the delegate for the action sheet so that when it was dismissed it would call that block.

-(void) actionSheet:(UIActionSheet *)actionSheet willDismissWithButtonIndex:(NSInteger)buttonIndex
{
    if (callBack != nil) {
        callBack();
    }
}

Done!!! Oh but wait this solution is really no different than the other hacks that I was trying to avoid plus how do I know which button on the action sheet was pressed? What about the other delegates for UIActionSheet?

So let’s take this a step further and actually find a way to handle all the delegates for UIActionSheetDelegate and at the same time handling the information that comes back with each. By inspecting the different delegates that UIActionSheetDelegate offers we can see that while there are six different delegates they can actually be grouped into two common patterns that we can with the following:

typedef void(^DNISActionSheetButtonIndex)(UIActionSheet * actionSheet, NSInteger buttonIndex);
typedef void(^DNISActionSheet)(UIActionSheet * actionSheet);

With the pattern for each delegate typedef as a block that we can use let’s proceed with bringing them into a object that we can use for identifying a property that will represent each of the delegates for UIActionSheetDelegate.

typedef void(^DNISActionSheetButtonIndex)(UIActionSheet * actionSheet, NSInteger buttonIndex);
typedef void(^DNISActionSheet)(UIActionSheet * actionSheet);

@interface DNISActionSheetBlocks : UIActionSheet

@property (strong) DNISActionSheetButtonIndex blockClickedButton;
@property (strong) DNISActionSheet blockWillPresentActionSheet;
@property (strong) DNISActionSheet blockDidPresentActionSheet;
@property (strong) DNISActionSheetButtonIndex blockDidDismissWithButton;
@property (strong) DNISActionSheetButtonIndex blockWillDismissWithButton;
@property (strong) DNISActionSheet blockActionSheetCancel;

@end

Then move on to the implementation of the delegates and plug each of them into the properties that we have just defined. The plan is that as each delegate is called that a log message will be printed to allow me to debug the application.

@interface DNISActionSheetBlocks () 

@end

@implementation DNISActionSheetBlocks

#pragma responding to actions
-(void) actionSheet:(UIActionSheet *)actionSheet clickedButtonAtIndex:(NSInteger)buttonIndex
{
    NSLog(@"blockClickedButton was called");
    if([self blockClickedButton] != nil) {
        [self blockClickedButton](actionSheet, buttonIndex);
    }
}

#pragma customizing behavior
-(void) willPresentActionSheet:(UIActionSheet *)actionSheet
{
    NSLog(@"blockWillPresentActionSheet was called");
    if ([self blockWillPresentActionSheet] != nil) {
        [self blockWillPresentActionSheet](actionSheet);
    }
}

-(void) didPresentActionSheet:(UIActionSheet *)actionSheet
{
    NSLog(@"blockDidPresentActionSheet was called");
    if ([self blockDidPresentActionSheet] != nil) {
        [self blockDidPresentActionSheet](actionSheet);
    }
}

-(void) actionSheet:(UIActionSheet *)actionSheet willDismissWithButtonIndex:(NSInteger)buttonIndex
{
    NSLog(@"blockWillDismissWithButton was called");
    if ([self blockWillDismissWithButton] != nil) {
        [self blockWillDismissWithButton](actionSheet, buttonIndex);
    }
}

-(void) actionSheet:(UIActionSheet *)actionSheet didDismissWithButtonIndex:(NSInteger)buttonIndex
{
    NSLog(@"blockDidDismissWithButton was called");
    if ([self blockDidDismissWithButton] != nil) {
        [self blockDidDismissWithButton](actionSheet, buttonIndex);
    }
}

#pragma cancelling
-(void) actionSheetCancel:(UIActionSheet *)actionSheet
{
    NSLog(@"blockActionSheetCancel was called");
    if ([self blockActionSheetCancel] != nil) {
        [self blockActionSheetCancel](actionSheet);
    }
}

@end

I begin to use this as is when I realize that my basic implementation won’t work because the initWithTitle method requires the delegate to be passed into it. So as I begin to quickly code up an init method it dawns on me how I am going to handle the various ways buttons can be added to an actionsheet? Ok so first things let’s just create an actionsheet without any buttons:

-(id) initWithTitle: (NSString *) title;

Implementation:

-(id) initWithTitle: (NSString *) title
{
    self = [self initWithTitle:title delegate:self cancelButtonTitle:nil destructiveButtonTitle:nil otherButtonTitles:nil, nil];
    
    return self;
}

Yes I know that an actionsheet without any buttons doesn’t do any good but for now I can test things out. Also with a basic actionsheet created I can manually add the buttons with a call to addButtonWithTitle. With a quick test I can now see things falling into place.

Like I said creating an actionsheet without any buttons really does no good. It’s comparable to building a car but not adding any wheels to it. How do I drive this thing? So let’s add a couple of more init methods.

  • initWithTitleAndButtons – actionsheet with a title and all the buttons we want displayed.
  • initWithButtons – the title is great and all but sometimes I can do without it, just show some buttons.

Both methods are almost identical with the only exception being the title information. Because of this I am only going to talk about initWithTitleAndButtons. For a complete look at the code you can go here.

Definition:

-(id) initWithTitleAndButtons:(NSString *)title cancelButtonTitle:(NSString *)cancelButtonTitle destructiveButtonTitle:(NSString *)destructiveButtonTitle otherButtonTitles:(NSString *)otherButtonTitles, ...;

The implementation is going to take some work because we will have to deal a variable number of buttons that can be supplied to it. During testing I also learned that there is an order in which you add generic buttons as well as cancel buttons and destructive buttons. So from the following implementation you can see that we first add the generic buttons followed by the cancel button and then finally add the destructive button.

-(id) initWithTitleAndButtons:(NSString *)title cancelButtonTitle:(NSString *)cancelButtonTitle destructiveButtonTitle:(NSString *)destructiveButtonTitle otherButtonTitles:(NSString *)otherButtonTitles, ...
{
    self = [self initWithTitle:title];
    
    if (self) {
        if (nil != otherButtonTitles) {
            [self addButtonWithTitle:otherButtonTitles];

            va_list arguments;
            id eachObject;

            va_start(arguments, otherButtonTitles);
            while ((eachObject = va_arg(arguments, id)))
            {
                [self addButtonWithTitle:eachObject];
            }
            va_end(arguments);
        }
        
        if (nil != cancelButtonTitle) {
            NSInteger index = [self addButtonWithTitle:cancelButtonTitle];
            [self setCancelButtonIndex:index];
        }
        
        if (nil != destructiveButtonTitle) {
            NSInteger index = [self addButtonWithTitle:destructiveButtonTitle];
            [self setDestructiveButtonIndex:index];
        }
    }
    
    return self;
}

Hopefully you will find this useful and if so check back on it because even as I wrote it and this blog I found some other areas for improvement. Might rethink the whole thing and give the developer a way to assign a block of code to an individual button?

For now you can find the source here and as always Happy Coding!!

Get in on the Ground Floor!!!

Having been a software developer for a few years I have to say that my favorite job offers or postings are those that guarantee their idea is revolutionary and as a developer I would be crazy to not want to get in on the ground floor.

Now I am not going to say that all startups are bad because clearly our industry has proven this point wrong.

What I do want to explain is that as a developer I and am I sure many others get this pitch sometimes too often. So recently when I was approached by a previous coworker looking for a developer to work on their new idea I tried to take some time to share some advice before turning down their offer.

DISCLAIMER – I know this person and while I am certain that their idea probably has some merit to it lately my time is filled with the workings of my own ideas on top of my normal work schedule and of course the schedule of a parent with a child whose day almost never seems to end of after school activities.

First and foremost you need to understand the simple fact that developers are regularly pitched the line about the next greatest idea. Don’t be discouraged if we don’t share your enthusiasm. Rather change your approach, remember that you need to sell your idea to us just like you would a potential investor or future customer.

Back when I was in college I wanted to get this part-time sales job because the hours were perfect and the commission was awesome. I learned their product (even better than the manager who interviewed me), was dressed to impress for the interview and attempted to wow with my knowledge.

At the end of the interview the manager asked me one simple question. “What is the most important skill of a salesperson?”

Stumped at first, the answer seemed simple, they had to know the product.

Wrong!!! The most important skill to a salesperson is to become their clients friend so as to build a level of trust when completing the deal. The interviewing manager sat down with me and explained as best as could be done to an 18 year old who knew everything at the time.

So first things first try to become friends with the development community and do so in a manner that doesn’t paint you as that creepy uncle who buys pizza for everyone. Take some time and learn the things we like to do and take an interest in us as much as you want us to take in your idea.

The next piece of advice should be simple and hopefully already be something you are doing.

Network, network, network.

I had recommend to my friend that they should try some of the local entrepreneurial events happening in our area.

Startup Weekend – I attended/competed in one of these events a couple of years ago and let me say that it was a blast. There is an even mix of people who are developers, marketers, sales and everyone else you can think of starting a company with. What makes these events successful is that from the very beginning a team is built which shares in the idea that the company they are building is the next greatest thing.

! Million Cups (1MC) – So while I have not attended my own local meet-up the positive feedback I hear from the community is that this is a must for new entrepreneurs. It ties back to the original idea of networking.

Hackathons – Ok so I know that some of you are probably thinking this would be a great event to meet developers and pitch your idea. While I can’t speak for all developers at these events I can share with you my personal belief. I am at the event to hangout with people who love developing software as much as I do. An unwelcome approach at an event like this will automatically land you in that creepy uncle category I mentioned earlier.

Finally, if a developer is going to dedicate their free time towards your project then you should understand that they will expect to be an equal partner in the adventure. You may have come up with the idea but we were the ones who transformed your idea into a tangible thing.

Take these recommendations and use or pursue them however you choose. I am sure that along the way more will be learned but hopefully this will get you started. I normally sign-off by saying “Happy Coding” but instead let me say this…

Happy entrepreneuring and the best of luck in making your idea a revolutionary one.