Category Archives: Uncategorized

Coming Back!!!

It has been a couple of years since I have last written and so much has happened in that time-frame. Some personal projects with friends and family as well as life changes.

Along the way I was able to further hone my skills as an iOS developer and self publish some more apps. During this time I expanded my knowledge and with a desire to always share my new found knowledge I would constantly think “hey I should write a blog article on this” yet the actions fell short. As more time passed I started to dismiss writing because I wasn’t sure how to start back up. Which brings me back to this post and something I have been thinking and praying about these past few weeks.

Part of me has been thinking that I should just delete all the previous articles or maybe event create a whole different site. Then I read through some of my previous posts and thought how could I delete these great memories? In short I couldn’t. =)

So in this past week I decided to leave everything in place but start writing my articles with an approach of going over some simple problems with new approaches I have picked up over these past couple of years. Some of it might repeat what I have done previously but with a different twist. I also plan to share some of my tricks and snipets that I use a lot.

I will try to reference sights where I gained knowledge for some of these articles. In case I miss it I would recommend viewing my Resources page because in it you will find all of my favorite sites for tools and also as a source of where I have gained much of my knowledge.

So keep watching as my goal is to write an article a week and maybe even expand this platform further.

Enjoy and as always Happy Coding!!!
VNC Experiences on Raspberry Pi

I wanted to share some experiences of getting VNC setup on my Raspberry Pi.

How hard could the experience be? A basic search on google and there are a ton of tutorials and examples to follow getting everything setup. Being a fan of adafruit I followed a detailed tutorial they had for setting up VNC which can be found here.

Initially it was working great till I noticed that I wasn’t accessing the current session. For most configurations I suspect this works fine but for my current project I want my VNC session to use the active session that I would see if I had a KVM (keyboard, video, mouse) plugged into my Pi.

Certainly I am not the first to notice or expect this. After trying different configurations and researching things further I discovered that the VNC tool used in all of the tutorials (tightvnc) doesn’t support access to the current session. Apparently in order to achieve this I would have to install and run X11VNC.

The following is the steps that I took to get everything setup:

Install X11VNC

Open a terminal session on your Raspberry Pi and run the following:

sudo apt-get update
sudo apt-get install X11VNC

When installing X11VNC it will want you to confirm the install so make sure to answer Yes to these questions. After it’s done installing you could run x11vnc but you’ll probably want it to work automatically after restarting your Pi.

Setting up X11VNC

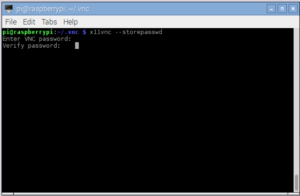
In your terminal session you will want to setup a password that can be used when connecting. To set this up you will want to do the following:

x11vnc --storepasswd

When you are done x11vnc should report back that the password was written at /home/pi/.vnc/passwd. For some assurances I checked the file because I didn’t like the idea of password being stored in plain text.

Next you’ll want to set everything up so that x11vnc is running whenever your pi is started. In your terminal session change to the config directory.

cd /home/pi/.config

There should already be an autostart directory but go ahead and run a list to see everything that exists in the directory.

ls

If you do not have an autostart directory then you will need to create one by using mkdir.

Go ahead and change to the autostart directory.

cd autostart

Next you’ll want to create an entry for x11vnc.

nano X11VNC.desktop

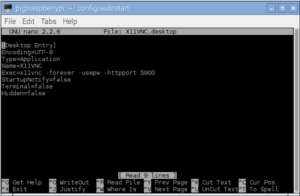
Add the following changes to the file:

[Desktop Entry]
Encoding=UTF-8
Type=Application
Name=X11VNC
Exec=x11vnc -forever -usepw -httpport 5900
StartupNotify=false
Terminal=false
Hidden=false

To close hit Ctrl-X to keep the changes and exit. Next you will want to restart your Pi.

Testing X11VNC

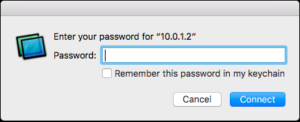
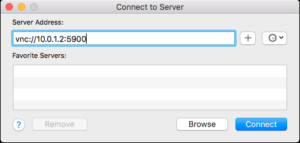
Your configuration might be different than mine however I am running OS X and I can use the built in VNC viewer from Finder. By clicking on the desktop or if you already have a Finder window open you can do a Cmd-K to connect to a VNC Server.

You will want to enter the address of your Pi using the following format:

vnc://<IP Address>:<Port Number>

If you need to get the IP address of your Pi you can run ifconfig from a terminal session on it. Once you have entered the Server Address Click on Connect and you should be prompted to enter the password that you supplied.

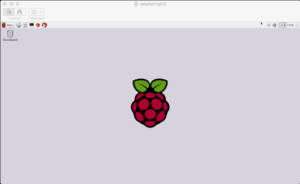
You should now be connected.

Enjoy and as always Happy Coding!!!
Catching the Bug… Server Side Swift

In my opinion Swift is an extremely exciting and powerful language so like many others I was excited when I heard Apple’s decision to Open Source Swift and even more when a Linux compatible version of Swift was released. Writing apps for different platforms with Swift sounded exciting but what immediately started running through my mind was the ability to do server side development with Swift much like I have done with Javascript, Java and C#.

I started to review the different options available and I finally decided to take the next step of going from reading/dreaming about the possibilities to actually doing something. It turns out that I have the perfect opportunity as my website for DooScrib was taken offline and I would like to bring it back online (future updates to the plugin planned).

The following is the environment that I have chosen:

Server Side Frameworks

There are actually several choices out there and as time progressed I narrowed down the options that I was most interested in to the following:

Kitura is great and has a lot of information as well as the security of have a big name like IBM behind it. However as a personal preference I automatically gravitated towards Perfect and Vapor and have been watching both as they have progressed over the last few months.

To be honest I think both Perfect and Vapor are great choices. At a later time I might actually even pursue a separate review of Perfect.

Getting Started

So for those interested in following I plan to write several different posts over the next few weeks as I setup a Virtual Machine running Ubuntu, install and get Swift running and finally begin working with Vapor.

Keep following and as always Happy Coding.