Category Archives: Swift

Programmatic iOS UI Development

Say what?

That was my initial reaction a few years ago when seeing the UI for an iOS app developed entirely in code. I thought to myself what a crazy idea and clearly the person doing this just didn’t understand storyboards or the power of them and Auto Layout. I had envisioned this developer as some old developer clinging with all their might to the old ways.

Senior Resisting Talking about Retirement Home

As time passed I heard more mention of it from other developers and then I came across these great YouTube tutorials here where the developer did everything in code. The speed and ease that he operated with was amazing (almost hypnotizing). Maybe this whole programmatic UI had something to it?

So I started to play around with the idea and developed some gists that I could use to copy from and speed up my coding. As time progressed I noticed my skills and knowledge were improving an my UI development was actually happening faster.

To get you started in the process I am going to cover that simple app that everyone loves, a table view that displays some basic rows of information.

Create Project

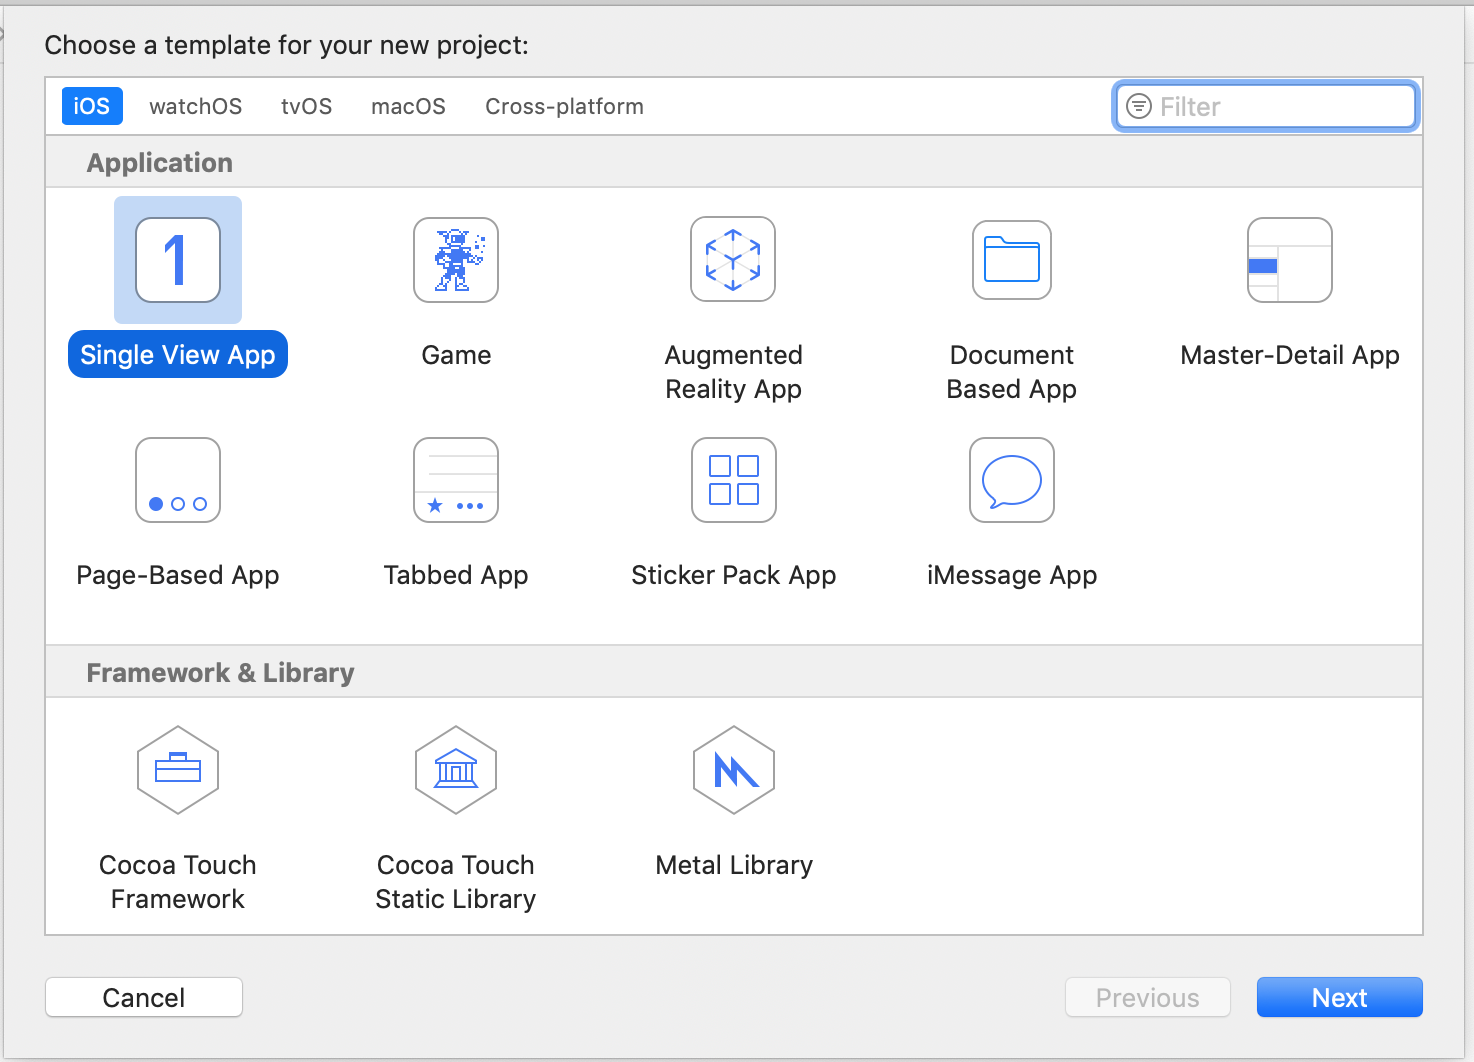
Start off with creating a Single View Application:

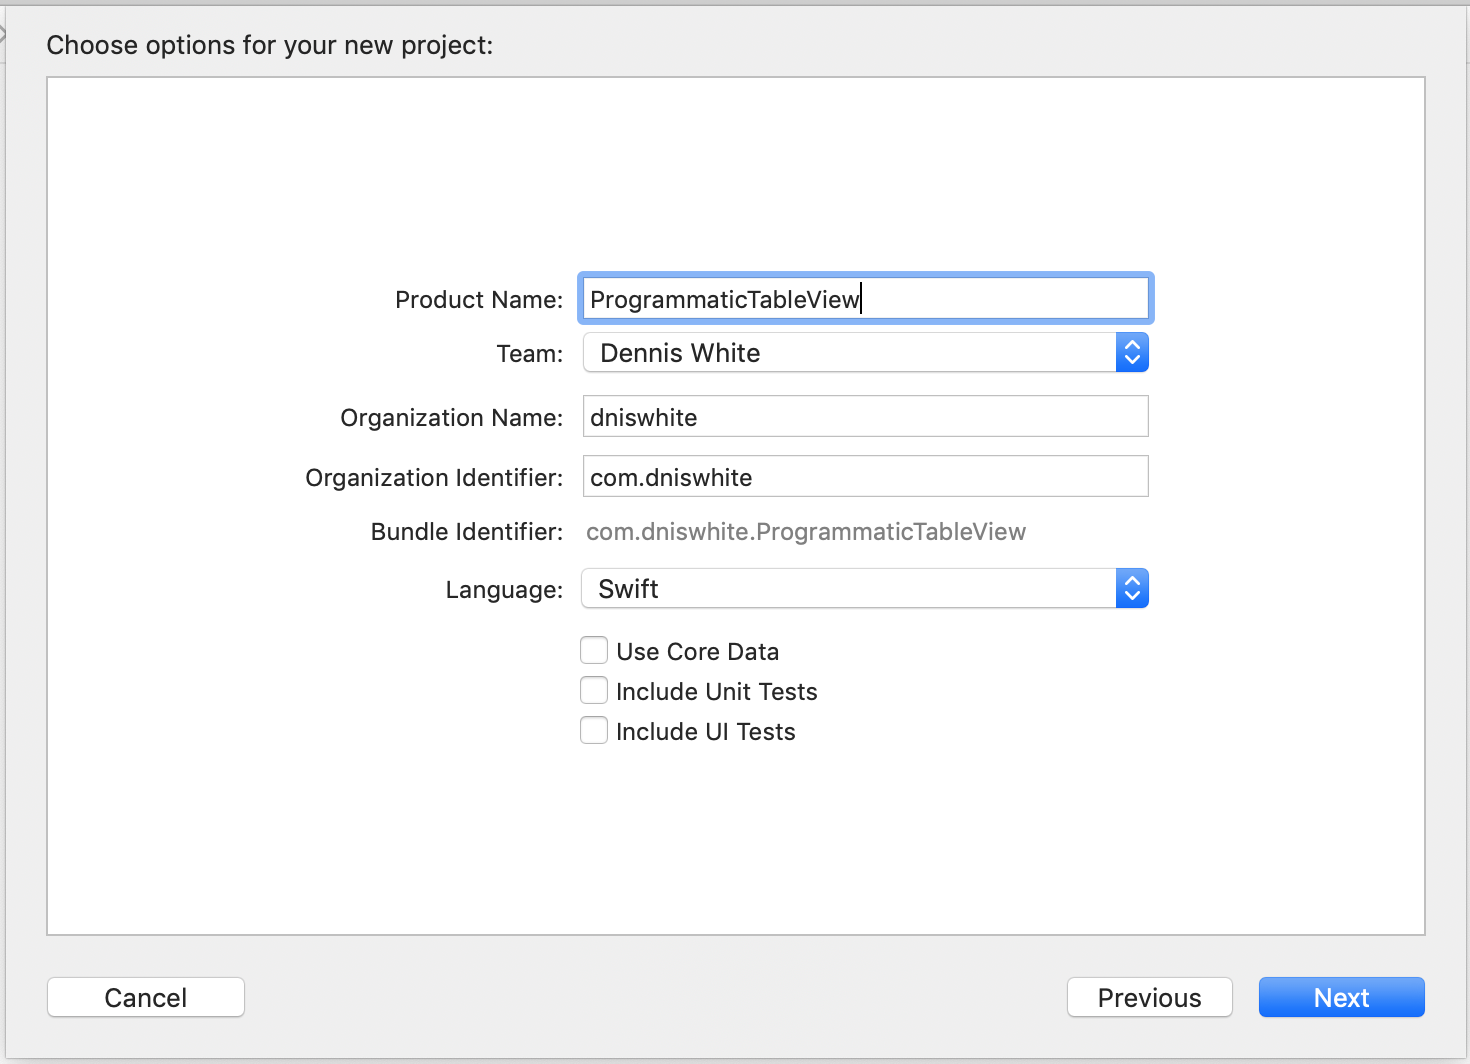
With the project setup let’s do a quick review of it and all the items that were created in the process of setting it up.

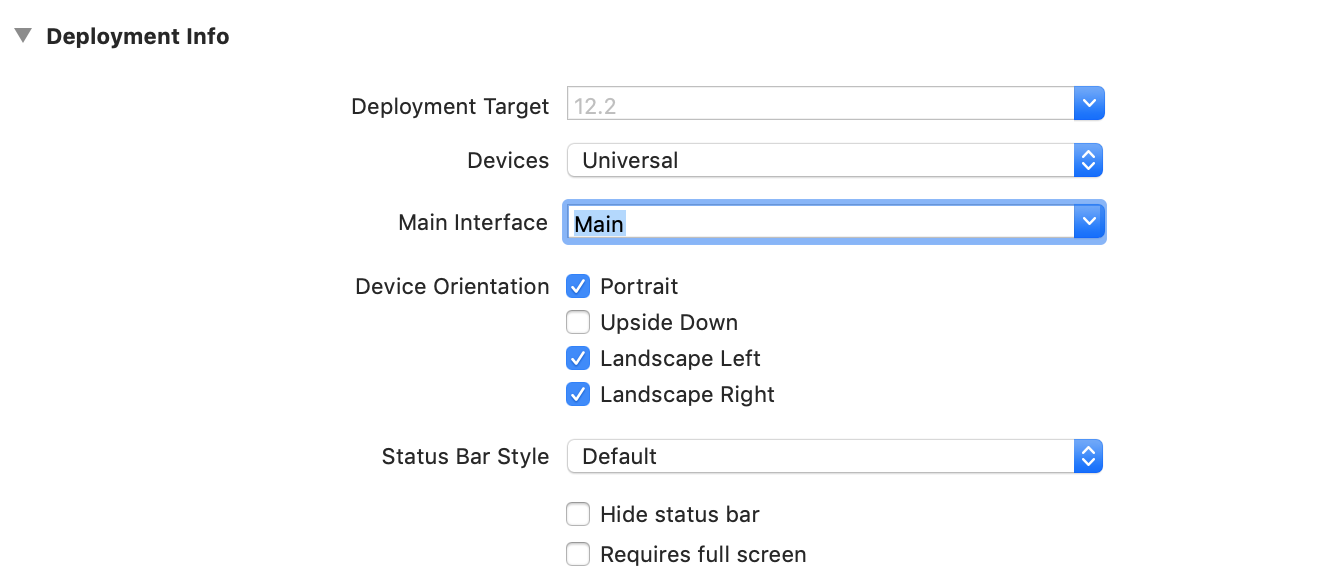
If you notice in Main Interface the dropdown has selected an item called Main. This is from the Main.storyboard that was created when the project was being setup. Let’s go ahead and select that item and just delete it so that the dropdown is blank.

Now look at the different files that were created.

Just to make sure there is nothing sneaky going on select the Main.storyboard file and delete it and ow if you run the app you will get a big black screen.

Not very exciting right?

Right now you are getting a black screen because we have not setup a window for the application to run with. To fix that click on the AppDelegate.swift file and let’s edit the application method so that the window which is already a property of the class gets created.


    window = UIWindow()
    window?.makeKeyAndVisible()
        
    let viewController = ViewController()
    window?.rootViewController = viewController


So what’s happening?

The first two lines we added are to create a window that will contain the view(s) for our application. Then the next two lines are going to instantiate the View Controller that was created with our project and then set the windows root view controller as our view just created. Go ahead and run the application again.

Another blank black screen what gives?

What is happening now is that we have created our applications window and associated a view with it. However the default color for the background of a UIViewController is black which explains our current situation. Let’s solve that so that we have something somewhat interesting and normal to what we would get using a storyboard.

Click on the ViewController.swift file and add the following line of code to the viewDidLoad method.


    view.backgroundColor = .white


When you are done your viewDidLoad should look similar the following:


    override func viewDidLoad() {
        super.viewDidLoad()

        // Do any additional setup after loading the view.
        view.backgroundColor = .white
    }

If you run the application now it should show you a blank view controller and look like a new application would if you were using storyboard.

Setup Table View

So blank views are great and all but lets add some content; for this demo I want to display a few rows of information in a table view. Our rows of information will be some static information and in future tutorials I will cover things like connecting to a RESTful service or using Core Data to make the information more dynamic.

The first change to be made is changing the current View Controller so that it displays a table view. With the ViewController still open in the editor lets change it’s inheritance.


class ViewController: UITableViewController {


If you run the application again you will notice that your blank view has changed slightly and it is displaying a collection of blank rows. Exciting right?

So let’s add some meat to our new Table View controller so that it displays some rows with information.

Register Cell for Rows

In order to display rows of information we will have to register at least one type of cell that we will want displayed. Since table views have the ability to display different sections as well header and footer rows they also give us the power to display different types of rows for each.

For this demo I am just going to register a classic UITableViewCell. In the viewDidLoad let’s make an update to it so it looks like the following:


    override func viewDidLoad() {
        super.viewDidLoad()

        // Do any additional setup after loading the view.
        view.backgroundColor = .white

        // register a cell type that will be displayed
        tableView.register(UITableViewCell.self, forCellReuseIdentifier: "cellId")
    }


This change will make more sense as we make the changes to display each row with it’s own information being displayed.

Display Rows

With the inheritance of UITableViewController comes the requirement that we implement two required methods that come from the UITableViewDataSource protocol. The following method shows a basic implementation that sets the number of rows to be created and populated with data as five rows:


    override func tableView(_ tableView: UITableView, numberOfRowsInSection section: Int) -> Int {
        return 5;
    }


For populating each row you have to implement the method that requests for you to create a cell for a row at a specified index. The following method shows a quick example of creating a row and populating it with some text:


    override func tableView(_ tableView: UITableView, cellForRowAt indexPath: IndexPath) -> UITableViewCell {
        let cell = tableView.dequeueReusableCell(withIdentifier: "cellId", for: indexPath) as! UITableViewCell
        
        cell.textLabel?.text = "some text"
        
        return cell
    }


I remember many years ago when I started working with UITableViews I wondered what is that dequeReusableCell? So what’s happening here is that while you can specify your table has several hundred rows in it what’s actually going to happen is that only the rows being displayed will be created and as you scroll through your table view it will continually call this method allowing you to update each row based on the index (using indexPath) into your data source.

Where did that text label come from?

A UITableViewCell comes built in with an UIImageView named imageView and two UILabels named textLabel and detailTextLabel. The part that is cool about these controls is that the cell will orient itself based on the use of each control. For more detail review the Apple Documentation here that discusses configuring a cells content.

Data Source

We could leave the example as it is but instead lets tie to a very basic data source. In this situation we will create a member variable in the ViewController that is an array of strings and that can be used to populate the number of rows as well as information in each cell.


    var dataSource = ["Row One", "Row Two", "Row Three", "Row Four"]


Finally update the methods for returning the row count as well as a UITableViewCell for each row.


    override func tableView(_ tableView: UITableView, cellForRowAt indexPath: IndexPath) -> UITableViewCell {
        let cell = tableView.dequeueReusableCell(withIdentifier: "cellId", for: indexPath) as! UITableViewCell
        
        cell.textLabel?.text = dataSource[indexPath.row]
        
        return cell
    }
    
    override func tableView(_ tableView: UITableView, numberOfRowsInSection section: Int) -> Int {
        return dataSource.count;
    }


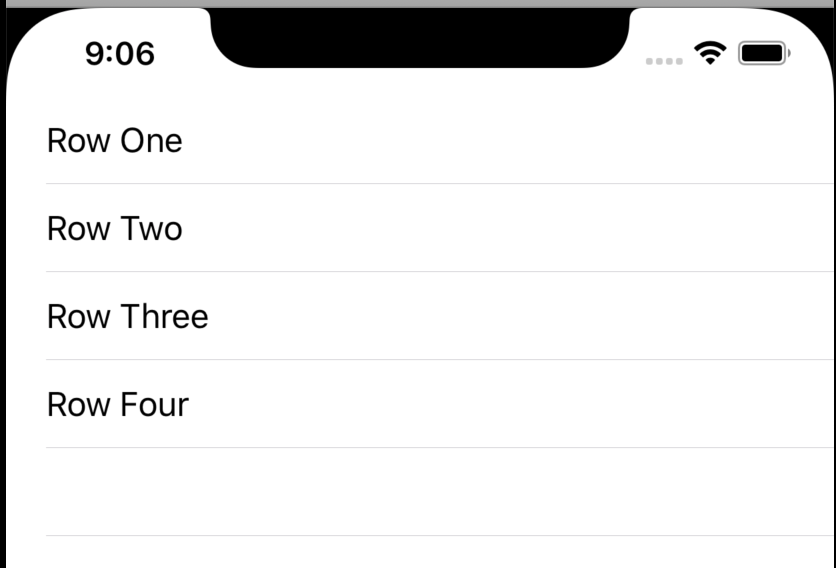
With all that in place you can build an run the application and assuming you are using a simulator you should see something similar to the following:

Conclusion

I will admit in the beginning I had some initial reservations about the idea of building my UI programmatically but I gave it a fair shake. As time progressed I found that while doing things programmatically I was actually gaining a better of how Auto Layout and how components were laid out and handled on the screen.

Am I going to totally abandon using storyboard? Probably not but honestly my first and most preferred approach has become developing my UI’s programmatically.

In future articles I will start detailing more about control layout. For now though I hope this was enough to get you started and thinking you want to see and learn more.

For now you can view the complete source here and as always Happy Coding!!!

Development of a Swift Vapor App using WebSockets

I have been working with WebSockets since their release. While I like the idea of a browser based full duplex communication between the client and server one of my favorite interests with WebSockets has been getting multiple browser based apps to communicate with each other in realtime.

In this article I will give an example for a realtime application where users can collaborate on a shared html5 canvas using a jQuery plugin I wrote a few years back. I will be using Swift on the server side with the web framework Vapor.

For more information about the plugin that I developed you can review an article that I wrote for it here.

Requirements

You will of course need to have Swift 3.x and Vapor installed on your local machine and if you haven’t already done this there is a great step by step tutorial you can follow here.

Don’t stop here If you think Swift is only for Apple OS’s because it can actually be run on multiple OS’s and the above instructions will given you an example of setting it up to run on Ubuntu. I wrote this article demonstrating how to setup a Virtual Ubuntu machine for Vapor.

Finally the rest of this post assumes you already have a basic understanding of HTML, Javascript, Swift and Vapor. For those wanting to learn more about Vapor there are some great how to videos and articles to get started here.

Setting up Client

I don’t plan to cover the details of laying out the page but for a quick demonstration of what everything will look you can go here.

Talking with Server

To make communications between the clients simple I will be using JSON objects.

The following code will be used to store and manage the WebSocket communications that are sent and received:

function dooScribConnection(host) {
    var scrib = this;
    scrib.ws = new WebSocket('wss://' + host);
            
    scrib.ws.onopen = function() {
        var connRequest = JSON.stringify({'command': 'connect', 'username': id})
        scrib.ws.send(connRequest)
    };
            
    scrib.ws.onmessage = function(event) {
        var msg = JSON.parse(event.data);
                
        if (msg.command == "click") {
            prevPoint[msg.username] = msg;
        } else if (msg.command == "paint") {
            surface.drawLine(prevPoint[msg.username].X, prevPoint[msg.username].Y, msg.X, msg.Y, msg.color, msg.pen);
            prevPoint[msg.username] = msg;
        } else if (msg.command == "clear") {
            surface.clearSurface();
        }
    };
            
    scrib.send = function(event) {
        scrib.ws.send(event);
    };
};

The connection to the server is established as soon as the WebSocket object is created. The onOpen function is called once that connection is established. By making a call to send information to the server here it will allow the server to store instance information about each of its connections. To make sure that each user is uniquely identified the id var is established using the following:

var id = Math.round($.now()*Math.random());

For messaging to the server I added the send function which will send the JSON objects that are passed as a parameter to it.

Whenever a message is received the onmessage function is called and from there you can switch on the command type (added to the JSON message) and take the appropriate action. Currently the following commands (JSON objects) are of interest for handling inside the browser:

  • click – this is used to establish the starting point for when the user has started drawing.
  • paint – this is used to draw a line from the previous point to the current one.
  • clear – a command that allows users to clear the drawing canvas.

Setting up Canvas (DooScrib plugin)

The following code is for setting up the jquery plugin as soon as the page has been loaded and is ready:

$(document).ready(function(){
    var height = $('#raw() { #surface }').height();
    var width = $('#raw() { #surface }').width();

    dooscrib = new dooScribConnection(window.location.host + "/dooscrib");
    surface = new $('#raw() { #surface }').dooScribPlugin({
        width:width,
        height:400,
        cssClass:'pad',
        penSize:4,
                                                                  
        onMove:function(e) {
            var msg = JSON.stringify({'command': 'mousemove', 'username': id, 'X': e.X, 'Y': e.Y });
            dooscrib.send(msg);
        },
                                                                  
        onClick:function(e) {
            var msg = JSON.stringify({'command': 'click', 'username': id, 'X': e.X, 'Y': e.Y});
            dooscrib.send(msg);
        },
                                                                  
        onPaint:function(e) {
            var msg = JSON.stringify({'command': 'paint', 'username': id, 'X': e.X, 'Y': e.Y,'pen': surface.penSize(),'color':surface.lineColor()});
            dooscrib.send(msg);
        },
                                                                  
        onRelease:function(e) {
            var msg = JSON.stringify({'command': 'release', 'username': id, 'X': e.X, 'Y': e.Y});
            dooscrib.send(msg);
        }
    });
});

The drawing for the current surface is handled by the plugin which then messages everything that it is being done. With each message there is JSON message created which is then sent to the server which will redirect to all the other users.

Setting up Server

For the server implementation I created the following Controller object which handles all of the WebSockets communications as well as routes for the different web pages:

final class ScribController {
    var dooscribs : [String: WebSocket]
    var droplet : Droplet

    init(drop: Droplet) {
        dooscribs = [:]
        droplet = drop

        droplet.get("", handler: scribRequest)
        droplet.get("about", handler: aboutRequest)
        droplet.socket("dooscrib", handler: socketHandler )
    }
    
    func aboutRequest(request: Request) throws -> ResponseRepresentable {
        return try droplet.view.make("about")
    }

    func scribRequest(request: Request) throws -> ResponseRepresentable {
        return try droplet.view.make("socket")
    }
    
    func socketHandler(request: Request, socket: WebSocket) throws {
        var scribUser: String? = nil
        
        // create an active ping to keep connection open
        try background {
            while socket.state == .open {
                try? socket.ping()
                drop.console.wait(seconds: 5)
            }
        }
        
        socket.onText = { socket, message in
            let json = try JSON(bytes: Array(message.utf8))
            
            guard let msgType = json.object?["command"]?.string, let user = json.object?["username"]?.string else {
                return
            }
            
            if msgType.equals(any: "connect") {
                scribUser = user
                self.dooscribs[user] = socket
                
                let response = try JSON(node: [
                    "command":"connected",
                    "username": user
                    ])
                
                // send a connect response to everyone including self
                for (_, connection) in self.dooscribs {
                    try connection.send(response)
                }
            } else if (msgType.equals(any: "clear")) {
                for (_, connection) in self.dooscribs {
                    try connection.send(json)
                }
            } else {
                // send message to everyone (minus self)
                for (scrib, connection) in self.dooscribs {
                    if (!scrib.equals(any: user)) {
                        try connection.send(json)
                    }
                }
            }
        }
        
        socket.onClose = { ws, _, _, _ in
            guard let user = scribUser else {
                return
            }
            
            let disconn = try JSON(node: [
                "command": "disconnect",
                "username": user
                ])
            
            // tell everyone (minus self) about disconnect
            for (remote, connection) in self.dooscribs {
                if (!remote.equals(any: user)) {
                    try connection.send(disconn)
                }
            }
            
            self.dooscribs.removeValue(forKey: user)
        }
    }
}

I won’t be covering the get route handlers that are established in the controller with any great detail. From the code you however you can see that they are sending back the pages the user requested.

Sending JSON Messages

Much to my surprise the WebSocket class does not have a function for sending JSON packets so I created the following extension to handle that:

extension WebSocket {
    func send(_ json: JSON) throws {
        let data = try json.makeBytes()
        
        try send(data.string)
    }
}

Handling Messages

Messages are handled via the onText EventHandler which is called with a WebSocket and String passed in via closure. The string data is parsed into a JSON object so that command and user id that should be sent with each message.

For the connect message the user id and accompanying WebSocket are saved in the dooscribs dictionary and then a connected message is created and, much like the clear message, it gets to sent to all of the connections.

The other messages that are received get forwarded to all of the current connections with an exception for the one where the message.

Handling Connections and Users

Each connection will be stored in the dooscribs dictionary which is a pairing of the unique id that was generated by the browser and the WebSocket for their connection.

Whenever a connection is closed (user leaves page, closes browser) the onClose handler is called informing of the event. For cleanup purposes send a disconnect message to all of the clients that are stored in the dooScribs dictionary, minus the connection that just closed, as well as remove that user from the dictionary.

Issues – Random Disconnection

Something I noticed in my development was that clients were disconnecting for what seemed at the time as unknown reasons. After some research I found that “quiet” connections will automatically get disconnected. To handle this I created the background handler so that it would ping the socket every 5 seconds to keep channels open.

Conclusion

Hopefully this gives you some ideas for processing realtime data in your applications. In the future I plan to expand the dooScrib application so that it can handle different rooms as well text based messaging. The code for the dooScrib plugin as well a Node.js Implementation and this Vapor implementation can be founder here.

For now enjoy and as always Happy Coding!!!

Resolutions and Challenges

Well an old year has gone and new one is on its way.

Achievements of 2016

Each year, like everyone else, I make some resolutions and do my best to achieve each of them during the year. I can say that last years achievement I am most proud of was giving up soda and any other carbonated drinks. After a lifetime of drinking carbonated drinks this was harder to achieve than I expected it would be.

I can now say though that while eating at restaurants I really enjoy drinking water now and when I see my savings on the check it makes me feel a bit better.

At the same time I wanted to make sure that I didn’t replace carbonated drinks with high sugar drinks. Again a success and I found a new taste for a Green Tea.  Success!!

On the technical front last year was quiet and I decided to focus my time on getting more comfortable with my current knowledge set and just enjoy what I had.

Resolution for 2017

For my personal achievements I want to stop going out to eat as much as we normally do and instead eat at home more often. When I discussed this with my wife it caused some initial frustrations but I explained to her with the savings it will help achieve my other resolution for the next year. I would like for our family to take either a European vacation or something that allows us to travel to the east coast.

On the technical front I have the following planned:

  • Rewrite dooscrib.com with a Swift and Vapor backend.
  • Complete the first phase of smart mirror project.
  • Update iOS apps with more features.
  • Start going to more programmer meetings again.
  • Do a presentation on Vapor and Server Side Swift.

As I complete or work on some of my resolutions for the new year I will write about them and share my experiences.

Until then Happy Coding!!!